Sunday, July 29, 2007

Using CachedRowSet

When developing MVC-centric web applications, we often have to create custom classes to contain the results of a database query. This is because we can never pass a JDBC ResultSet from the servlet to the JSP. Once the underlying Statement object of a ResultSet is closed, the ResultSet is closed along with it. So many developers have to create some sort of a "Data Transfer Object" in order to contain the data within the ResultSet.

CachedRowSet, in a nutshell, is just a disconnected ResultSet. Unlike a ResultSet, you can access data within a CachedRowSet even if the underlying Connection or Statement object has already been closed.

To use CachedRowSet, be sure to import the right package.

import com.sun.rowset.CachedRowSetImpl;

Populating a CachedRowSet is simpler that it might seem. Assuming you have a ResultSet variable resultSet, here's how to create one.

CachedRowSetImpl crs = new CachedRowSetImpl();
crs.populate(resultSet);


That's all there is to it. Now, we can pass the database query results from the servlet to the JSP without having to use an intermediary object.

request.setAttribute("results", crs);
request.getRequestDispatcher("/results.jsp").forward();


Once you have populated the CachedRowSet, you can access its data as if it was an ordinary ResultSet! In the JSP, you can access the results using scriptlets:

<%
CachedRowSetImpl crs = (CachedRowSetImpl) request.getAttribute("results");
while (crs.next()) {
  out.println(crs.getInt("productId"));
  out.println(crs.getString(2));
}
%>

What? Scriptlets!?! Can you use the JSTL <c:foreach> tag to iterate through a CachedRowSet instead? The answer is no, but I have discovered a way to do this using a workaround, which will be the subject of another post. Til then! :)
Top 10 NetBeans 6 Shortcut Keys

Here are what I consider the top 10 NetBeans shortcut keys that every Java programmer should know:

1. Ctrl+Space - Open Code Completion
2. Alt+Shift+F - Reformat Code
3. Ctrl+Shift+I - Fix Imports
4. Ctrl+/ - Add/Remove // comments
5. Ctrl+Shift+O - Go to Type / File
6. Alt+Enter - Show suggestion
7. Ctrl+[ - Move to matching bracket
8. F6 - Run Project
9. Shift+F6 - Run File
10. Shift+F1 - Search Javadoc

For a complete list of keyboard shortcuts, select Keyboard Shortcuts Card under the Help menu.

Accessing Databases from Netbeans

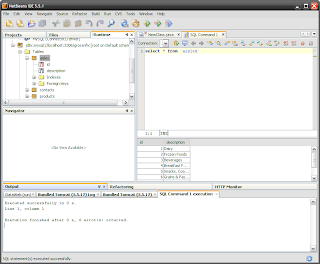
Netbeans has very nice integration with JDBC databases. You can view data, and even run any SQL statement from within Netbeans. Assuming you already have a project open, here are the steps to do so:

Adding your JDBC Driver
  1. In the Runtime Window, expand the Databases node.
  2. Right-click on the Drivers node, and select New Driver...
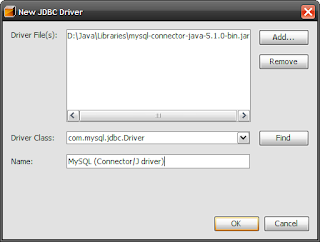
  3. Click the Add button and browse to where your JDBC driver is located, and select your driver.
  4. In the Driver Class field, type in the string needed to load your driver. For example, this string is "com.mysql.jdbc.Driver" for the MySQL Connector/J driver.
  5. In the Name field, give a name for your driver. For example, "MySQL Connector/J".
  6. Press OK to close the New JDBC Driver window. You should see the driver now listed under the Drivers node.

Creating a New JDBC Connection
  1. Right-click on the Databases node, and select New Connection...
  2. In the Name drop-down, select the new driver you just added.
  3. In the Database URL field, type in the URL you use to connect to the database. For MySQL Connector/J, this is something like jdbc:mysql://theserver:3306/yourDB.
  4. In the User Name field, type in the username you use to connect to the database.
  5. In the Password field, type in the password you use to connect to the database.
  6. Press OK to close the New Database Connection window. You should now see your new connection defined under the Databases node.

Testing your Connection
  1. Right-click on your newly defined connection, and select Connect...
  2. In the Connect window, enter the database Username and Password, then press OK. Once connected, you should now see the Tables node under your connection.
  3. Expand the Tables node to view the tables in your database. You can right-click on one of your tables and select View Data...
  4. To run an SQL statement, you can right-click on the connection node, or any of the nodes under it, and select Execute command... This will open an SQL Command window.
  5. Type in your SQL statement in the SQL Command window, right-click on the window and select Run Statement. You should then see the results!

That's it! You may also want to view my other blog on how to Set up a Connection Pool with Tomcat. If you want to know more about Java and J2EE, please visit Active Learning where I conduct training courses.