Monday, December 15, 2014

Java 8 Lambda Expressions

What is Functional Programming?
  • Programming paradigm
  • Not the same as procedural programming
  • Allows you to pass anonymous functions as parameters
  • Implemented in Java 8 through lambda expressions
  • Used to simplify code
Basic Syntax:

(parameters) -> { function body }

Using Lambda Expressions as Functional Interfaces


You can use lambda expressions to replace interface implementations that have only a single method.

Here's a typical way to create a thread using a Runnable object.

Thread thread = new Thread( new Runnable() {
    public void run() {
        System.out.println("Hello");
    }    
});


thread.start();

You can use a lambda expression to replace an interface with a single method:

Thread thread = new Thread(
    () -> {
        System.out.println("Hello");
    }
);

thread.start();

Adding Parameters

Here's a typical way to create an ActionListener.  The ActionListener interface only has a single method called actionPerformed(ActionEvent e).

JTextField textField = new JTextField();
JLabel label = new JLabel();

textField.addActionListener(new ActionListener() { 
    public void actionPerformed(ActionEvent event) {
        label.setText(event.getActionCommand());
    }
});

You can add parameters to lambda expressions as well.  Here's the equivalent code using lambda expressions.

JTextField textField = new JTextField();
JLabel label = new JLabel();

textField.addActionListener((ActionEvent event) -> {
    label.setText(event.getActionCommand());
});

The above code can even be simplified further by eliminating the type of the parameter.

JTextField textField = new JTextField();
JLabel label = new JLabel();

textField.addActionListener(event -> {
    label.setText(event.getActionCommand());
});

Hope this simple tutorial helped you get started with Lambda expressions!


Gavin Lim is the lead Java instructor of ActiveLearning, Inc. http://www.activelearning.ph


Monday, September 15, 2008

Using Java WebStart in NetBeans 6.1

This tutorial assumes that you already have a desktop application project opened in Netbeans, and an Apache web server installed. For a screencast, you can play the movie below:

  1. Right-click on your project’s node in the Projects window.

  2. Select Properties.

  3. Click the Run node, and in the Main Class field, click Browse, and select the class which contains the main() method.

  4. Expand the Application node, and you will see Web Start.

  5. Check the check box for Enable Web Start.

  6. In the Icon field, click on the Browse… button and select the icon image for your application. This should be a 64x64 JPEG or GIF file.

  7. In the Codebase field, select User defined (e.g. HTTP deployment)

  8. In the Codebase Preview field, type the URL where your JNLP file will be stored. In my case, my web server’s IP address is 192.168.1.99, and I want to place my application and the JNLP file in a directory named “webstart” under my web server’s document root. So, I specify http://192.168.1.99/webstart in this field.

  9. If your application does not require a network connection to run, then select the “Allow Offline” check box.

  10. Press OK to close the Project Properties window.

  11. Press F11 to Build the project.

  12. Go to the Files Window by pressing Ctrl+2.

  13. Expand your project’s node, and you should see the dist folder, which should contain the following files:
    YourApp.jar
    • launch.html
    • launch.jnlp
    • your icon file

  14. Locate the dist folder in your file system, and copy its contents to a directory within your web server’s document root. In my case, I place the files in the directory named “webstart”, which is inside my web server’s document root folder. Note that this directory should be the same directory you specified in step 8.

  15. Make sure your web server recognizes the JNLP MIME type. If you are using Apache, you simply need to add the following line to the file named mime.types, which is located in the config folder of your Apache installation.
    application/x-java-jnlp-file JNLP

  16. Start your web server.

  17. In the client machine, make sure the JRE is installed. Access the test page for launching the application via JNLP. In my case, the URL is http://192.168.1.99/webstart/launch.html. Click on the test link and this should launch your application automatically.


Creating Shortcuts for Your Application
If you selected the Allow Offline check box in step 9, you can create Desktop and Start Menu shortcuts for your application. Here’s how.
  1. Go to Control Panel, and double-click on the Java Applet. In the General tab, and under the section for Temporary Internet Files, click on the View… button.

  2. You will see a list of downloaded Web Start applications. Right-click on the application which you want to make shortcuts for, and select Install Shortcuts. Press the Close button.
The shortcuts should now be installed on your desktop and your Start Menu!

Monday, December 24, 2007

Using HashMap with Struts <html:options> tag

One of the most common tasks in writing HTML forms is populating drop-down lists with values. In Struts, this can be done by using the <html:option> tag. In some cases, you may want to populate the drop-down with values retrieved from the database. Once retrieved from the database, you may want to store the value/label pairs in a HashMap. What many don't know is that you can actually use the <html:options> tag to generate the list based on a HashMap.

In the following scenario, these assumptions are made.
  1. An attribute named "aisles" is stored as an attribute in the ServletContext.
  2. "aisles" is a HashMap. The key is the aisle Id, while the value is the aisle's description. For example, the key = "1", and the value = "Dairy".
Now, in the JSP, to create a drop-down list populated with the key and value pairs in the "aisles" HashMap, all you need to do is write:

<html:select property="aisleId">
<html:options collection="aisles" property="key" labelProperty="value" />
</html:select>


This will generate HTML similar to the following:

<select name="aisleId">
<option value="1">Dairy</option>
<option value="2">Frozen Foods</option>
<option value="3">Beverages</option>
<option value="4">Breakfast Foods</option>
<option value="5">Snacks, Cookies, &amp; Candy</option>
<option value="6">Grains &amp; Pastas</option>
<option value="7">Soups &amp; Canned Goods</option>
<option value="8">Baking Goods</option>
<option value="9">Condiments</option>
</select>

Sunday, August 05, 2007

Creating a Connection Pool Using NetBeans

In a previous blog entry, I outlined the steps to create a connection pool within Tomcat. As promised, here is the easy way to create a DataSource using NetBeans wizards. This assumes that you have already created a database connection. For more details, see my article on Accessing Databases from NetBeans. Assuming you have a web application project already open, here are the steps.

  1. Select File > New File.
  2. Under Categories, select Sun Resources.
  3. Under File Types, select JDBC Connection Pool. Click Next.
  4. You will now be asked to choose a database connection. Give your pool a name. Take note of this name as this will be the name used within your code. Since this article assumes you have already defined a database connection, select Extract from Existing Connection, then click Next.
  5. In the Add Connection Pool Properties dialog, the defaults should be ok, but double check to make sure that everything is in order.
  6. From here on, you can select Next to add optional properties, or you can just select Finish.

That's it. Now if you want to use your connection pool within your code, right-click on the source editor window, select Enterprise Resources > Use Database. Select the DataSource from the drop-down list. This will generate code similar to the following:

private DataSource getJdbcGrocerificDB() throws NamingException {
Context c = new InitialContext();
return (DataSource) c.lookup("java:comp/env/jdbc/yourPoolName");
}

You can use this method to acquire the DataSource, and once you have it, you can just use DataSource.getConnection() to acquire a Connection object from the connection pool.

Sunday, July 29, 2007

Using CachedRowSet

When developing MVC-centric web applications, we often have to create custom classes to contain the results of a database query. This is because we can never pass a JDBC ResultSet from the servlet to the JSP. Once the underlying Statement object of a ResultSet is closed, the ResultSet is closed along with it. So many developers have to create some sort of a "Data Transfer Object" in order to contain the data within the ResultSet.

CachedRowSet, in a nutshell, is just a disconnected ResultSet. Unlike a ResultSet, you can access data within a CachedRowSet even if the underlying Connection or Statement object has already been closed.

To use CachedRowSet, be sure to import the right package.

import com.sun.rowset.CachedRowSetImpl;

Populating a CachedRowSet is simpler that it might seem. Assuming you have a ResultSet variable resultSet, here's how to create one.

CachedRowSetImpl crs = new CachedRowSetImpl();
crs.populate(resultSet);


That's all there is to it. Now, we can pass the database query results from the servlet to the JSP without having to use an intermediary object.

request.setAttribute("results", crs);
request.getRequestDispatcher("/results.jsp").forward();


Once you have populated the CachedRowSet, you can access its data as if it was an ordinary ResultSet! In the JSP, you can access the results using scriptlets:

<%
CachedRowSetImpl crs = (CachedRowSetImpl) request.getAttribute("results");
while (crs.next()) {
  out.println(crs.getInt("productId"));
  out.println(crs.getString(2));
}
%>

What? Scriptlets!?! Can you use the JSTL <c:foreach> tag to iterate through a CachedRowSet instead? The answer is no, but I have discovered a way to do this using a workaround, which will be the subject of another post. Til then! :)

Top 10 NetBeans 6 Shortcut Keys

Here are what I consider the top 10 NetBeans shortcut keys that every Java programmer should know:

1. Ctrl+Space - Open Code Completion
2. Alt+Shift+F - Reformat Code
3. Ctrl+Shift+I - Fix Imports
4. Ctrl+/ - Add/Remove // comments
5. Ctrl+Shift+O - Go to Type / File
6. Alt+Enter - Show suggestion
7. Ctrl+[ - Move to matching bracket
8. F6 - Run Project
9. Shift+F6 - Run File
10. Shift+F1 - Search Javadoc

For a complete list of keyboard shortcuts, select Keyboard Shortcuts Card under the Help menu.

Accessing Databases from Netbeans

Netbeans has very nice integration with JDBC databases. You can view data, and even run any SQL statement from within Netbeans. Assuming you already have a project open, here are the steps to do so:

Adding your JDBC Driver
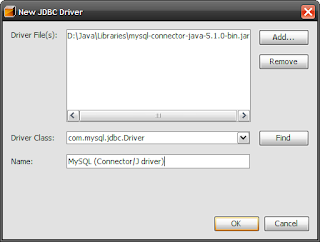
  1. In the Runtime Window, expand the Databases node.
  2. Right-click on the Drivers node, and select New Driver...
  3. Click the Add button and browse to where your JDBC driver is located, and select your driver.
  4. In the Driver Class field, type in the string needed to load your driver. For example, this string is "com.mysql.jdbc.Driver" for the MySQL Connector/J driver.
  5. In the Name field, give a name for your driver. For example, "MySQL Connector/J".
  6. Press OK to close the New JDBC Driver window. You should see the driver now listed under the Drivers node.

Creating a New JDBC Connection
  1. Right-click on the Databases node, and select New Connection...
  2. In the Name drop-down, select the new driver you just added.
  3. In the Database URL field, type in the URL you use to connect to the database. For MySQL Connector/J, this is something like jdbc:mysql://theserver:3306/yourDB.
  4. In the User Name field, type in the username you use to connect to the database.
  5. In the Password field, type in the password you use to connect to the database.
  6. Press OK to close the New Database Connection window. You should now see your new connection defined under the Databases node.

Testing your Connection
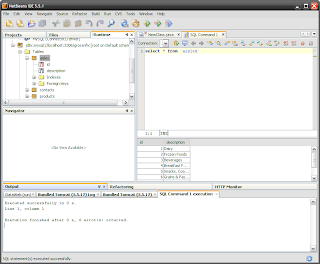
  1. Right-click on your newly defined connection, and select Connect...
  2. In the Connect window, enter the database Username and Password, then press OK. Once connected, you should now see the Tables node under your connection.
  3. Expand the Tables node to view the tables in your database. You can right-click on one of your tables and select View Data...
  4. To run an SQL statement, you can right-click on the connection node, or any of the nodes under it, and select Execute command... This will open an SQL Command window.
  5. Type in your SQL statement in the SQL Command window, right-click on the window and select Run Statement. You should then see the results!

That's it! You may also want to view my other blog on how to Set up a Connection Pool with Tomcat. If you want to know more about Java and J2EE, please visit Active Learning where I conduct training courses.

Wednesday, November 01, 2006

Setting up a connection pool with Tomcat

I made so many attempts to make database connection pooling work with Netbeans and Tomcat, and little did I know that the solution is just in the Netbeans help documentation. Look up the topic "Setting up a Connection Pool on the Tomcat Web Server". In any case, here are the steps:

Assuming you already have a web application project open,

1. Go to the Tomcat administration page.
  • In Netbeans, go to the Runtime Window.
  • Expand Servers
  • Right-click on Apache Tomcat and Select Start
  • Expand Apache Tomcat
  • Expand Web Applications
  • Right-click on /admin
  • Select "Open in browser"
  • Enter username and password.(SEE NOTE BELOW!)

NOTE: Ironically, this is the most difficult part in setting up connection pooling. I had to spend a lot of time trying to find out what the default username and password is for the Tomcat Admin. So follow the instructions here carefully!
  • right click on the Tomcat server instance in the Runtime window.
  • select Properties
  • note the value in the Catalina Base field. Mine is C:\Documents and Settings\Gavin\.netbeans\5.5\apache-tomcat-5.5.17_base.
  • Go to this directory, and you will see a directory in it named "conf".
  • Under the conf directory, open tomcat-users.xml.
  • Look for the user whose role is "admin". That's the user you are looking for. Mine has the username "ide".

2. Add a JDBC Database Resource.
  • Once logged in, click Data Sources
  • Choose Create New Data Source Actions drop down in the right.
  • Type values such as the following to define your data source. My settings look like this. Change yours accordingly.
    • JNDI Name: jdbc/grocerificDB
    • Data Source URL: jdbc:mysql://localhost:3306/grocerific
    • JDBC Driver Class: com.mysql.jdbc.Driver
    • User name: root
    • Password: secret
3. Make sure the JDBC driver is placed in the common/lib directory of Tomcat's base directory.
NOTE:
The driver has to be placed there and not under your application's WEB-INF/lib directory. I really don't know why. Netbeans' bundled Tomcat server is in
<Netbeans folder>\enterprise3\apache-tomcat-5.5.17\common\lib.

4. In your application, edit WEB-INF/web.xml. Add the following lines:

<resource-ref>
<description>Grocerific DataSource</description>
<res-ref-name>jdbc/grocerificDB</res-ref-name>
<res-type>javax.sql.DataSource</res-type>
<res-auth>Container</res-auth>
<res-sharing-scope>Shareable</res-sharing-scope>
</resource-ref>

5. Replace jdbc/grocerificDB with the name you registered in Tomcat.

6. In your web app's META-INF directory, open context.xml, and it should look like this:

<?xml version="1.0" encoding="UTF-8"?>
<Context path="/DataSourceWeb">
<ResourceLink global="jdbc/grocerificDB" name="jdbc/grocerificDB" type="javax.sql.DataSource"/>
</Context>

7. Replace jdbc/grocerificDB with the name you registered in Tomcat, and replace /DataSourceWeb with your application's name.

8. To reference your DataSource from a servlet,

Context ctx = new InitialContext();
Context envCtx = (Context) ctx.lookup("java:comp/env");
DataSource ds = (DataSource)envCtx.lookup("jdbc/grocerificDB");
Connection conn = ds.getConnection();

That's it! let me know if you have any questions. I just discovered a super easy way to do all of this using Netbeans wizards. I'll post it when I have the time.

It's amazing how Netbeans has progressed. I still wonder why so many people still use Eclipse when Netbeans seems to be so much better.

Visit Active Learning if you want to attend my training courses on Java and J2EE.

Friday, October 13, 2006

Macbook design flaws

I just recently bought a white Macbook. Coming from the Windows world, I was looking forward to the much hyped Mac experience. I'm a bit disappointed.

First - the white Macbooks easily get dirty. As obsessive compulsive I am using my Macbook, I can't help but notice darkened areas in the wrist pad after occasional use only. I find myself buying a silicone skin for the keyboard and wrist pad worth P1800 just to avoid this problem. I say this is a rip off when they actually sell these for just $5 each in China.

Second - I have been very careful handling the Macbook, but it still gets some light scratches on the outer surface. The material is just very prone to scratches, and I wonder why Apple insists on form over functionality. Go to a Mac store. They even sell scratch creams just for this. They're actually making money out of the design flaw. Great huh? My friend has the same problem, so I can't say that this is an isolated incident. I'm sure that Macbook users here experience the same thing.

Third - In a world where 2 mouse buttons are already considered passe', I wonder why Apple insists on a one button trackpad. Hey, the second mouse button actually works when you connect a mouse. So why didn't they just add a second mouse button to the Macbook? Tradition? Maybe I'm just new to the keyboard, mice, and the interface, but I looked at the keyboard shortcuts, and noticed that I had to hold down one more button to do this and that. It's kind of annoying.

Fourth - There's just something wrong with the edges on the wrist area of the Macbook. They're so sharp, I find myself rubbing my wrists from time to time.

Fifth - Who the hell uses Mini-DVI? I do a lot of presentations, and to use my Macbook, I have to buy a $20 mini-DVI to VGA adapter to connect the Macbook to a projector. Oh, they sell it P1,800 locally.

Sixth - You have to use a coin to take out the battery? I don't use the battery when my Macbook is plugged in, so I take it out often. I find it annoying that I have to look for a coin whenever I want to take out the battery. Why not just a simple battery release?

On the other hand, the MacOS looks stunning, although I haven't gotten used to the interface and keyboard shortcuts just yet. Spotlight's speed is amazing. OS is rock solid. Haven't had a restart nor a hang since I bought it, well except when I had to update to MacOS 10.4.8. And the boot up time is just unbelievable.

Sorry guys, I just don't know why there's such a hype over macs. After my first month in the Mac world, all I can say is, Mac is nice, but it's not that great. I do hope it's just the transition that's causing all the disappointment.